There is another page about SQLite
Introduction
We will use MySQL as the database management system that we will store our data including crosswords, words, machine learning results etc. It is open-source and convenient to figure out configurations.
We will either use a JSON parser that parses the JSON files and loads the data into the database, or use the online tool served by [1] to generate SQL scripts that load exactly the same data saved in the JSON files to the database.
The database will be communicating to the web-page to retrieve/update the data. As the play framework doesn't support a driver for a specific database system [2, 3], we will add the dependency for the MySQL driver in our application. Then, ideally, we will be able to connect to the database server and execute any query we want within scala, e.g., [4].
So, the first challenge is to write a small scala scripts that connects to the local database, and inserts/updates/.. some data, which we can hopefully re-use in the web-page code.
MySQL Installation and Running SQL Queries within Scala
1) Download MySQL MSI Installer, use web community if you have internet connection: http://dev.mysql.com/downloads/installer/
Note#1: 32-bit installer includes both 32-bit and 64-bit MySQL installation options
Note#2: It might require you to create an oracle account, create one by following the instructions in the web-site.
2) Run the installer, accept the terms & conditions
3) Choose Custom as the Setup Type
4) Select all the packages listed but opening the "+" buttons until the lowest level. If at the lowest level there is only one option to install such as "MySQL Notifier 1.1.6 - X86", select this. If there are more than one options to selects such as "MySQL Server 5.6.22 - X64" and "MySQL Server 5.6.22 - X86", use X64 if your machine is 64-bit, use X86 if your machine is 32-bit.
5) In the next screen, you should see the "Execute" button. Click on Execute to download and install the packages. It'll take couple of minutes.
6) Once they all complete, click on Next. In the upcoming screen it should show the status of "MySQL Server 5.6.22" and "Samples and Examples 5.6.22" as "Ready to Configure". Again, click on Next.
7) In this screen, we will set server configurations. Use the following configurations (note that these should be the default configurations anyway, please verify them):
- Set "Config Type" as "Development Machine" (should have been selected by default already)
- Select "TCP/IP" with "Port Number" as 3306
- Select "Open Firewall port for network access"
- Unselect "Named Pipe" and "Shared Memory"
- Select "Advanced Options"
Click on Next.
8) In this screen, we will create the root user, an admin user, and a guest user.
- For the root user, the username is already "root". Set the password for the root user as "Root2015"
- In the lower level of the screen, click on "Add User" to add an admin user. Use the following configurations:
Username: admin
Host: localhost
Role: DB Admin
Authentication: MySQL
Password: Admin2015
- In the lower level of the screen, click on "Add User" to add a guest user. Use the following configurations:
Username: guest
Host: localhost
Role: DB Designer
Authentication: MySQL
Password: Guest2015
Click on Next.
9) In the following screen:
- Select "Configure MySQL Server as a Windows Service"
- Set "Windows Service Name" as MySQL56 (as by default)
- Unselect "Start MySQL Server at System Startup"
- Select "Standard System Account"
Click on Next.
10) In the following screen:
- Set the name for "Error Log" as "mysql.err"
- Select "General Log", and set the name of the file path as "mysql.log"
- Select "Slow Query Log", and set the name of the file path as "mysql-slow.log"
- Select "Bin Log", and set the name of the file path as "mysql-bin"
- Set "Server Id" as 1.
Click on Next.
11) Click on Execute.
12) Click on Finish. In the following screen, it should show the status of "MySQL Server 5.6.22" as Configuration Complete", and "Samples and Examples 5.6.22" as "Ready to Configure". Click on Next.
13) In the following screen, click on "Check" to see if the root user works on the server. Then, click on Next.
14) Click on Execute. If it says "Someting is taking time longer than expected", click on wait.
15) Click on Finish. In the following screen, it should show the status of "Samples and Examples 5.6.22" as "Ready to Configure". Click on Next.
16) Installation has been complete. Select "Start MySQL Workbench after Setup" and click on Finish.
What is MySQL Workbench?
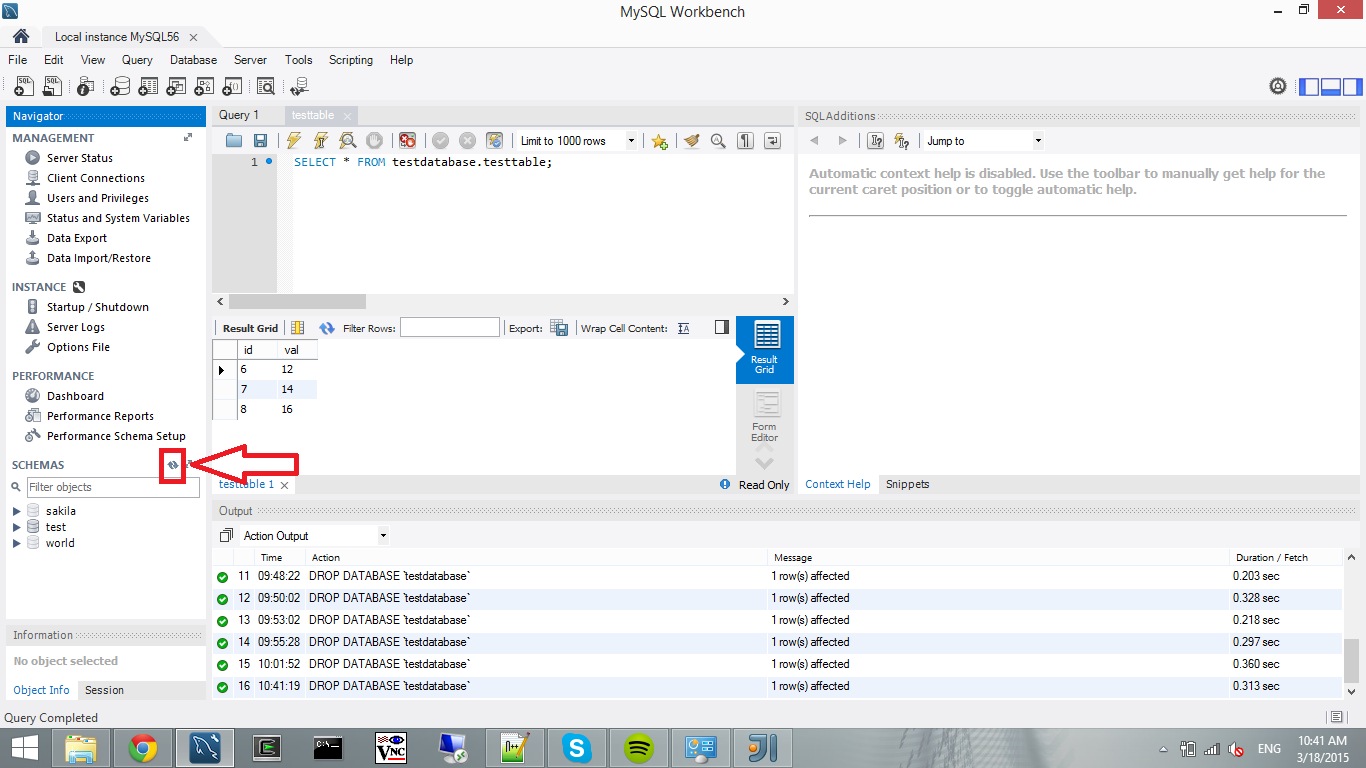
MySQL Workbench is a tool to connect to a MySQL Server instance. In our case, we have a MySQL56 on the local machine. Once we open MySQL Workbench, it should show a "Local instance MySQL56". Once we click on "Local instance MySQL56", we can see the MySQL Workbench user interface that's connected to the local server instance MySQL56. Once we do that, the server starts to run, and we are ready to run MySQL queries within the scala. Although we can execute SQL queries within the MySQL Workbench user interface, at this point, we will not use it. We will use MySQL Workbench only to check if the queries we run in scala works or not.
How to run queries within Scala?
To run queries withing scala, please do the following.
1) Open MySQL Workbench, and click on the "Local instance MySQL56"
2) Download the mysql-connector jar:
a) Go to: http://dev.mysql.com/downloads/connector/j/
b) Select "Platform Independent", download the zip file.
c) Extract the zip to some place you know
2) Run the scala code I pushed into github: db/MySQLHelloWorld.scala. Before running add the "mysql-connector-java-5.1.34-bin" jar to your Scala project from the folder you extracted in step (2). To add a jar to your project in IntelliJ IDEA, go File --> Project Structure --> Modules.
3) The output of the Scala code should be:
id:7 val:14
id:8 val:16
4) If you go to MySQL Workbench and click on the refresh button (I pointed in the figure below), you should see a new database named "testdatabase". If you extend the testdatabase-->Tables, you should see testtable. That together with (3) show your Scala code successfully connected to the database, created the tables and inserted/read some rows from the table.
5) You can follow the comments in the MySQLHelloWorld.scala code to understand what is going on.
Let me know if you have any questions!
Cheers!
Utku
Crossword SQL
Schema
We have chosen to use the schema whose entity-relationship diagram is as following:
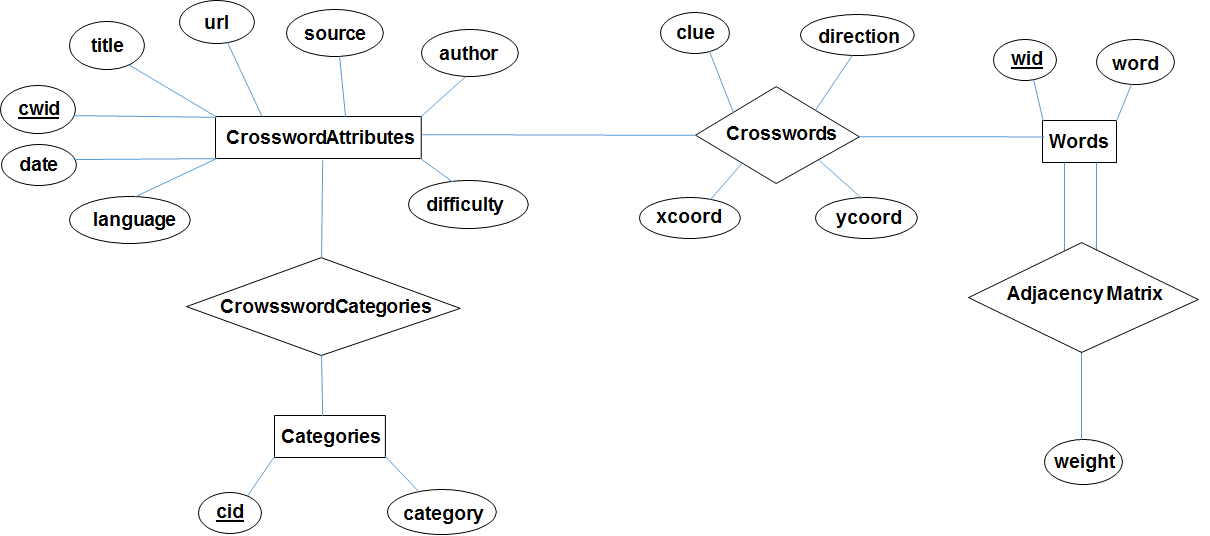
There are six tables in the schema:
1) Words: keeps the words with a unique word id (wid).
2) CrosswordAttributes: keeps the attributes for a crossword. There is one row for each crossword determined uniquely with a crossword id (cwid).
3) Categories: keeps the list of categories available for all possible crosswords
4) CrosswordCategories: maps CrosswordAttributes to the set of categories that this crossword has.
5) Crosswords: maps CrosswordAttributes to the words to actually form the crossword. For each crossword there are multiple words referred and a unique crossword attribute. To get a complete crossword, one should (given the crossword id (cwid))
(a) get the word ids (wid) from the Crosswords tables
(b) based on the word ids gotten from (a), get the words from the Words table
(c) get the crossword attributes from the CrosswordAttributes table
(d) get the category ids (cid) from the CrosswordCategories table
(e) based on the category ids gotten from (c), get the category's from the Categories table
We could merge Crosswords table with CrosswordAttributes table; however, then for each word in the crossword, we would have to keep the same attribute information again and again, which is waste of space.
We could merge Crosswords and Words tables but then we would repeat the same set of words for different crosswords, which is waste of space. Also, words can be extracted from different resources separately from crosswords, e.g., not every word might have the clue attribute.
We could merge the Categories and CrosswordCategories tables, similarly, it would be waste of space to repeat the same categories for different crosswords.
6) AdjacencyMatrix: keeps the graph showing the relationships among the words. Adjacency matrix is produced by the machine learning module, and saved into the database, and is the learned model that we produce to predict crosswords. Queries are made to this table to get the predictions. Observe that AdjacencyMatrix maps word ids from the Words table to other word ids in the Words table by also attaching a weight attribute.
SQL Code
I pushed three scala scripts to the github repository under ~/db/CrosswordSQL/ directory.
CreateTables.scala creates the database and the six tables. So, you run that only one time, and then you can manipulate the tables. You can take a look at the code to understand the table schema in more detail.
InsertCrosswords.scala inserts a sample crossword (that I just made up) and adjacency matrix to the database. The inserted crossword is as following:
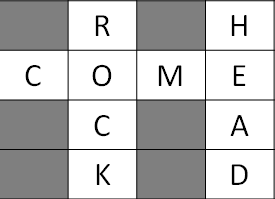
RetrieveCrosswords.scala queries the created tables with the inserted data. I put some select queries for each table.
Ideally you should be able to use these codes inside the web-framework to put crosswords, and retrieve them to browse. Please refer to the comments in the codes to understand what it means for each query.
Let me know if you have any questions,
Best!
Utku
REFERENCES
[1] http://databaseimportscriptor.com/
[2] http://stackoverflow.com/questions/10007029/steps-needed-to-use-mysql-database-with-play-framework-2-0
[3] https://www.playframework.com/documentation/2.0/JavaDatabase
[4] https://mkaz.com/2011/05/27/using-scala-with-jdbc-to-connect-to-mysql/